Transplanting seedlings is a crucial step in the gardening process. After investing time in nurturing your seeds and watching them sprout, it’s essential to transplant them safely to ensure they thrive in their new environment.
Whether you’re moving seedlings from seed trays to pots or directly into your garden beds, understanding the right techniques can make all the difference.
In this article, we’ll explore the step-by-step process of transplanting seedlings without causing undue stress to the plants, giving you a healthy, thriving garden.
Why Transplanting Seedlings Can Be Stressful
Seedlings are delicate. The roots are still developing, the stems are tender, and any rough handling can lead to transplant shock—a condition where plants struggle to adjust to their new environment.
Transplant shock can stunt growth, cause leaves to wilt, and even result in plant death. By following the right techniques, you can minimize this risk and help your seedlings transition smoothly.
When Is the Right Time to Transplant Seedlings?
Timing is everything. Transplanting too early or too late can lead to poor plant development. The best time to transplant seedlings is when:
- They have at least two sets of true leaves. These are the leaves that appear after the initial seed leaves.
- The weather conditions are stable. Transplanting during extreme temperatures or when there’s a risk of frost can be detrimental.
- The root system is well-established but not root-bound. Check if roots are circling around the bottom of the container.
Preparing Seedlings for Transplantation
Before you start moving your seedlings, it’s crucial to prepare them for the process. Here’s how:
1. Harden Off the Seedlings
Seedlings grown indoors or in controlled environments need time to acclimate to outdoor conditions. Hardening off is the process of gradually introducing seedlings to the outdoor environment. Start by placing them outside for a few hours each day, gradually increasing the time over 7-10 days. This step is vital for reducing transplant shock.
2. Water Seedlings Before Transplanting
Well-watered seedlings are less likely to suffer from shock. Ensure the soil is moist but not waterlogged. Watering the seedlings a few hours before transplanting helps the roots stay hydrated and minimizes stress during the move.
3. Prepare the New Planting Site
Whether you’re transplanting into larger pots or directly into the garden, the new site should be prepped in advance. For garden beds, ensure the soil is loose, well-draining, and enriched with organic matter. For pots, choose a container that’s at least one size larger than the current one with a nutrient-rich potting mix.
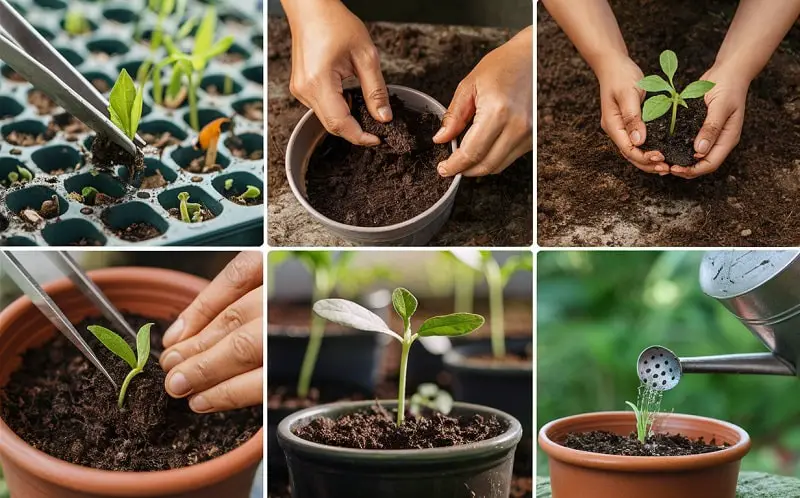
How to Transplant Seedlings Safely
Now that your seedlings are prepared, it’s time to move them. Follow these steps for a smooth transition:
1. Gently Remove Seedlings from Their Current Container
Handle seedlings by the leaves, not the stem. The stem is delicate and any damage can be fatal. Loosen the soil around the roots and lift the seedling carefully. If you’re working with seed trays, gently push the seedlings up from the bottom to avoid disturbing the roots.
2. Handle the Roots with Care
The root system is the lifeline of your seedling. Be cautious not to damage or break the roots. If the roots are bound tightly together, gently tease them apart to encourage healthy growth in their new environment.
3. Plant at the Right Depth
When transplanting, ensure the seedling is planted at the same depth as it was in its original container. For certain plants like tomatoes, you can bury the stem slightly deeper as they can grow additional roots along the buried portion.
4. Firm the Soil Around the Seedling
After placing the seedling in its new spot, backfill the hole with soil and gently press it down to eliminate air pockets. Avoid compacting the soil too much as it can restrict root growth.
5. Water Thoroughly After Transplanting
Once the seedlings are in place, water them immediately. This helps settle the soil and provides the moisture needed for the roots to establish themselves. Consider using a diluted liquid fertilizer to give your plants an initial nutrient boost.
Post-Transplant Care
Even with careful handling, seedlings can experience some stress after transplantation. To ensure they bounce back quickly, follow these care tips:
1. Provide Shade if Necessary
If you’re transplanting into a sunny location, provide some temporary shade for the first few days. This helps prevent sunburn and allows the seedlings to adjust gradually.
2. Keep the Soil Moist but Not Waterlogged
Consistent moisture is key. Check the soil regularly and water as needed, ensuring it stays moist but doesn’t become soggy. Overwatering can lead to root rot.
3. Mulch to Retain Moisture
Applying a layer of organic mulch around your seedlings can help retain soil moisture and keep the temperature stable. Mulch also prevents weed growth, reducing competition for nutrients.
4. Monitor for Pests and Diseases
Transplanted seedlings are more vulnerable to pests and diseases. Keep an eye out for common garden threats like aphids, slugs, and fungal infections. Early intervention can save your plants.
Common Mistakes to Avoid When Transplanting Seedlings
To ensure a successful transplant, steer clear of these common errors:
1. Transplanting at the Wrong Time of Day
The best time to transplant seedlings is in the early morning or late afternoon. Avoid midday when the sun is strongest, as it can cause unnecessary stress.
2. Overfertilizing Newly Transplanted Seedlings
While it’s tempting to give your seedlings a nutrient boost, too much fertilizer can do more harm than good. Stick to a diluted solution if you decide to fertilize.
3. Ignoring the Weather Forecast
Transplanting just before a heatwave, cold snap, or heavy rain can stress seedlings. Always check the forecast and plan accordingly.
4. Overcrowding Seedlings in Their New Location
Give each seedling enough space to grow and develop. Overcrowding leads to competition for nutrients, light, and water, resulting in weaker plants.
How to Tell If Your Transplant Was Successful
After a few days, you’ll be able to gauge how well your seedlings are adapting. Look for these signs of a successful transplant:
- New growth indicates that the roots are establishing well.
- The leaves remain green and vibrant.
- The seedling stands upright without wilting.
If your seedlings are showing signs of stress—such as yellowing leaves or drooping—don’t panic. Often, a little extra care, such as providing shade or adjusting watering, can help them recover.
Conclusion
Transplanting seedlings safely without stress requires attention to detail and careful preparation. By choosing the right time, preparing your seedlings, and handling them with care, you can significantly reduce the risk of transplant shock.
Remember to monitor your seedlings closely after moving them and provide the post-transplant care they need to thrive.
With the right approach, your garden will flourish with strong, healthy plants ready to reach their full potential. Happy gardening!