Transplanting plants from pots to the ground can be a transformative step in your garden’s development. Whether you’re transferring seedlings you’ve nurtured indoors or repotting store-bought plants, moving them into garden soil is crucial for healthy growth.
However, improper transplanting can lead to plant stress, stunted growth, or even death. To ensure a smooth transition, it’s important to follow some best practices for pot-to-ground transplanting.
This guide will walk you through every aspect of transplanting, from timing and preparation to aftercare, helping you achieve thriving plants that flourish in their new environment.
1. Why Transplanting Matters
Transplanting is more than just moving a plant from one place to another. It’s about giving your plants a permanent home where they can fully develop. While pots provide a controlled environment for young plants, they eventually outgrow their containers.
At this stage, the limited space can hinder root growth, leading to nutrient deficiencies and stunted development. Transplanting to the ground gives your plants more room to expand, enabling stronger root systems and, ultimately, healthier plants.
2. Choosing the Right Time for Transplanting
Timing is everything when it comes to successful transplanting. The ideal time for pot-to-ground transplanting depends on the type of plant and your local climate. Generally, the best seasons are spring and early fall when temperatures are mild, and there’s less risk of transplant shock. Transplanting in extreme heat or cold can stress plants and affect their ability to establish in the ground.
For flowering plants, it’s best to transplant before they begin blooming. For vegetables, wait until they’ve developed sturdy stems and several sets of leaves. A key tip: always check your last frost date if you’re transplanting in spring, as cold snaps can be detrimental to newly transplanted plants.
3. Preparing the Ground for Transplanting
A crucial step often overlooked is soil preparation. Garden soil should be rich in nutrients, well-draining, and free of weeds. Start by clearing the area where you plan to transplant. Loosen the soil using a garden fork or tiller to allow roots to penetrate more easily.
Incorporate organic matter like compost or aged manure to improve soil structure and fertility. A pH test can be helpful in determining whether you need to amend your soil to make it more suitable for the type of plant you’re transplanting.
4. Preparing Your Plants for Transplanting
Just as you prepare the soil, it’s essential to prepare your plants for the move. If your plants have been in containers for a while, their roots might be root-bound, which means they’ve grown tightly within the pot.
Gently loosen the root ball before planting, but be careful not to damage the roots. Soaking the plant in water an hour before transplanting can also reduce transplant shock by keeping the roots hydrated.
For plants grown indoors, hardening off is a necessary step. This process involves gradually exposing your plants to outdoor conditions over a week or two, allowing them to acclimate to direct sunlight, wind, and fluctuating temperatures.
5. Digging the Right Size Hole
When it comes to digging the planting hole, size matters. The hole should be twice as wide and about the same depth as the plant’s root ball. A wider hole gives roots the space they need to spread out and establish themselves more quickly.
If the hole is too deep, the plant may sink as the soil settles, leading to poor root development. On the other hand, a shallow hole can expose roots to the elements, causing them to dry out. The crown of the plant should sit level with or slightly above the surrounding soil.
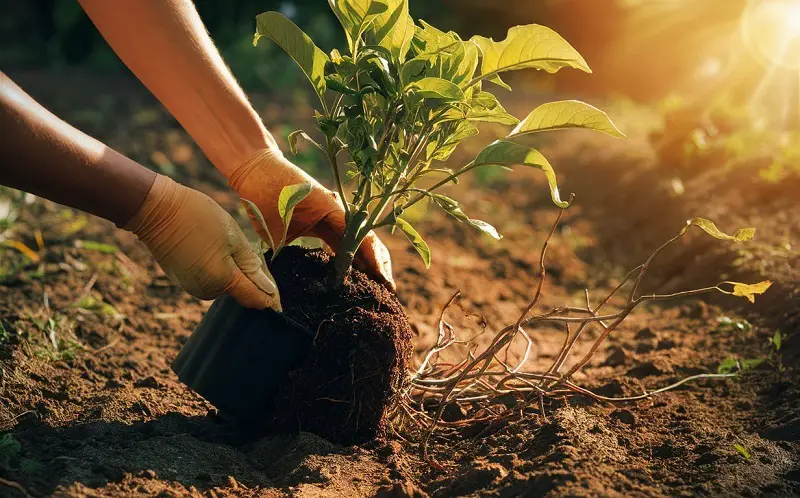
6. Transplanting with Care
After digging the hole and loosening the soil, it’s time to place your plant in its new home. Carefully remove the plant from its pot by holding the base of the stem and tipping it out. If the plant is stubborn, tap the sides of the pot or squeeze it gently. Once the plant is out, inspect the roots again. If they’re still tightly bound, tease them apart with your fingers.
Place the plant in the hole, making sure it’s centered. Fill the hole with soil, pressing gently to eliminate air pockets. Air pockets can cause the roots to dry out or rot, leading to plant failure. Avoid pressing too hard, as compacted soil can hinder root growth. Finally, water the plant thoroughly to help settle the soil and encourage root establishment.
7. Mulching for Moisture Retention and Weed Control
Mulching is an often underestimated step in pot-to-ground transplanting. A layer of organic mulch like straw, shredded leaves, or bark chips around the base of your plants serves multiple purposes. It helps retain soil moisture, which is critical for newly transplanted plants as their roots develop.
Additionally, mulch suppresses weeds that compete for nutrients and water. Be careful not to pile the mulch directly against the stem, as this can create a damp environment conducive to rot and pests.
8. Watering and Aftercare
The first few weeks after transplanting are crucial. Newly transplanted plants are vulnerable to stress and need consistent moisture to establish strong roots. Water deeply immediately after transplanting and continue to water regularly, especially during dry spells. The goal is to keep the soil evenly moist but not waterlogged. Overwatering can be just as harmful as underwatering, leading to root rot.
Observe your plants closely during this period. Look for signs of transplant shock like wilting, yellowing leaves, or stunted growth. If you notice these symptoms, your plant might need extra care, such as shading it from harsh sunlight or reducing watering until it recovers.
9. Supporting and Protecting Your Transplants
Some plants, especially taller or top-heavy varieties, may need additional support after transplanting. Consider using stakes or cages to keep them upright as they grow. This is particularly important for vegetables like tomatoes and peppers.
Additionally, protect your newly transplanted plants from pests like slugs, snails, and insects, which can be more attracted to stressed plants. You can use natural deterrents like diatomaceous earth or neem oil, or physical barriers like row covers.
10. Monitoring Long-Term Growth
Even after your plants have settled in, they’ll need regular monitoring to ensure continued health. Keep an eye out for any signs of nutrient deficiency, such as yellowing leaves or poor growth. Fertilizing with a balanced, slow-release fertilizer can help maintain strong, consistent growth. Regularly check the soil’s moisture levels and adjust your watering routine as needed.
Pruning may also be necessary for some plants to encourage bushier growth and prevent legginess. Remember to remove any dead or diseased foliage promptly to maintain a healthy garden environment.
Conclusion
Transplanting plants from pots to the ground is a vital step for a thriving garden. With the right timing, careful preparation, and diligent aftercare, you can ensure that your plants not only survive the move but thrive in their new home.
From preparing the soil to monitoring long-term growth, every step plays a critical role in the success of your transplant.
By following these best practices, you’ll be well on your way to a lush, healthy garden filled with robust plants that grow stronger each season.
Happy gardening!